The race to eat the soybeans

One of the great things about dried beans is that they have a long shelf life … and they’re certainly not something we worry about wasting.

Usually.

But, it looks like we’ll be making an international move later this year — and that means trying to use up pantry items that won’t make the move, and that we aren’t likely to be able to donate or give away. Like the soybeans … which we buy 25 pounds at a time.

Soy beans

So many to eat, so little time

So, for the past couple of weeks, we’ve been trying to figure out new ways to use the beans (aside from tofu and soy milk), with varying degrees of success. These are some of the recent attempts.

Soy noodle #FAIL

Usually we make our noodles the old-fashioned way: with eggs and flour. When the dough was a little too dry a few weeks ago, I tried adding a bit of okara, and that worked well. So, I figured I’d try a batch with just flour and okara. The resulting noodles were nasty and gooey when cooked. #FAIL

Soybean casserole

I’ve never cooked with just plain soybeans, and so went hunting for recipes online, and found this recipe for a soybean casserole, which I adapted with the veg we had on hand. This was a definite win, and the roux added a nice depth.

Banana-soy smoothie pancake

Instead of using milk in the batter for this pancake, I used a banana-soy smoothie (1 cup soy milk & 1 banana) which I soured with a tablespoon of vinegar — and instead of egg, I used a heaping tablespoon of okara. Along with that were the usual suspects (1 cup flour, 1 tablespoon sugar, 1 teaspoon baking powder, 1/2 teaspoon baking soda, 1/2 teaspoon salt, 1 tablespoon melted butter). ‘Twas nice and fluffy.

Chinois’ make good tofu

Purchase decisions work in mysterious ways.

A few weeks back, the weather started to cool (ever so mildly, this being LA), which gave Bonnie Lee an urge to make steamed bread (she being from MA). Of course, steamed bread doesn’t feel quite right without baked beans, and in order to make baked beans, you need a little ketchup. 

So Bonnie Lee made ketchup. Then beans. Then steamed bread.

They all rocked. That being said, the ketchup was a bit of a pain to make, because our strainer was not well suited to the task.

About a week later, we stumbled across a chinois (a cone-shaped sieve with a closely woven mesh) at Sur la Table — something which would have been ideal, we figured, for the ketchup making. It was heavy and sturdy, and its mesh was finer than your average strainer, but coarser than cheesecloth. It seemed like just the thing for making soy milk, which can be a bit slow and messy using muslin. There was no price on it, but it was the last one, so we tossed in in our basket, figuring it wouldn’t cost that much. 

When we went to the cash, we learned that this little puppy would set us back $140. We had second thoughts, but figured it would be worth it if it sped up the soy milk & tofu-making process — and any lingering buyer’s regret went straight out the window when we made our first batch of soy milk the next day. Instead of coaxing and squeezing the milk through through the muslin, we just poured our soy slurry into the chinois and the milk came out the other side just as fast, leaving behind a nice, dry little cone of okara. We popped that into a container, and had a clean, rinsed chinois seconds later.

Since that first batch, we’ve also used the chinois to strain a batch of ginger beer, with similarly happy results. How I lived without a chinois for all these years, I will never know.

Identity crisis

Future ketchup?

Bonnie Lee’s ketchup (about ½ cup — suggest you at least double this)

Ingredients

  • 3 tomatoes chopped
  • ¼ onion chopped
  • 50 ml brown sugar
  • one cinnamon stick
  • five cloves
  • ¾ inch ginger, chopped
  • ½ teaspoon allspice
  • one crushed bay leaf
  • ½ cup vinegar
  • salt, to taste

Directions

  • Put the cinnamon, cloves, ginger, allspice and bay leaf in a cheesecloth sachet.
  • Put the sachet and the rest of the ingredients in pot, and simmer for 40 minutes
  • Purée the mixture, strain it (using a chinois, if you have one), and simmer strained liquid for 30 minutes
  • Let cool.

Better than Heinz, and a nice way to opt out of the waste stream associated with ketchup and ketchup bottle manufacture.


Leftover Butternut Squash Smoothies

Last night I roasted a whole butternut squash that has been in the fridge for nearly a month. It was a smallish squash, less than two pounds, but I still had two cups of leftover squash at the end of dinner.

As I stared at the remaining, flesh and the two bananas on the counter, I dreamt about breakfast. (Yes, I know, a full tummy and I can still daydream about my next meal.) Would a squash and banana smoothie be tasty?

Turns out yes, and I am not the first to pair the two. I googled and found two recipes that piqued my interest:

  • On the food blog, Perks of Being a Foodie, I found recipe that spiced up the smoothie so the author could get her pumpkin fix. And,
  • And VideoJug shows how to combine juice, bananas, and squash into a smoothie that kids will drink up.

Since I find the squash and banana sufficiently sweet, I omitted the honey and simply combined a banana, a cup of butternut squash, and some almond milk with ground cinnamon, ginger, and nutmeg. I suspect you can add any combination of spices. Any takes on a madras banana and squash smoothie?

Spicy squash & banana smoothie

Spicy squash & banana smoothie

In my research, I found a few other creative ideas that involve butternut squash. I did not want a pie or soup or gnocchi treat. Two recipes in that search have me thinking of new sauces and veggie ideas that go way beyond the squash.

Oh, and if you are wondering about our zero waste goal: I will eat the whole squash. Seeds can be roasted and the skin is edible. Simply roast your squash whole in the oven with a bit of oil and salt on the skin and you will have a tasty nosh that is 100% edible. I like it almost as much as baked potato skins.

Eggless, Yeastless Yummy “Stone Soup” Bread

Vegan bread with sun-dried tomatoes, onions, and sage.

Vegan bread with sun-dried tomatoes, onions, and sage.

In our new apartment, I want to have a “Zero Waste Kitchen”, but that means I have to use up as much as possible in the current apartment before we move. The idea is to start with a clean slate. To do that we need to make sure we do not bring bad habits with us. Today, I made bread, and in the process used up the last of our sun dried tomatoes, blue corn flour, extra jar of white four, and baking powder – as well as some almond milk. What I got, had the texture of a nice country loaf.

And it was 100% vegan.

Why Stone Soup Bread? Because, like Jean-Francois’s idea for stone soup, this recipe is so flexible that practically anything can go into it, and it complements salad or soup, and makes a nice sandwich. You could even use stone soup broth in the mixture. Best of all, I doubt I will ever miss traditional breads ever again.

I cannot take credit for the idea. I found the source recipes on the internet when searching for ways to use flour without eggs and yeast. I have Tish’s recipe at Food.com, Veggie Bon Vivant’s adaptation of Mark Bittman’s (How to Cook Everything), and a half day of looking at nearly empty jars and wondering what would work together.

Here’s what I did:

  1. Preheat over to 400F.
  2. In a large bowl, mix 3 cups of a variety of flours (blue corn, unbleached, corn meal, and whole wheat) with 1 tablespoon baking powder and 1 teaspoon salt.
  3. Chop 4 withering green onions and about 1/2 cup sundried tomatoes (in oil) and add them to the flour mixture. NOTE: I chopped the tomatoes on a wooden chopping board and left the oil on the board to use later when shaping the bread dough.
  4. Add 2 teaspoons dried sage to the flour mixture. Any herb would work, be creative.
  5. In a 2 cup measuring cup, combine 1/4 cup olive oil and 1-1/2 cups almond milk.
  6. Add liquids to flour mixture and mix until flour is moist but not very sticky.
  7. Turn dough on to wooden board (the one with the tomato oil). Flip a few times to shape into a ball.
  8. Drop ball onto baking sheet.
  9. Cook for 45 minutes.
Just out of the oven, not the blue colour from the blue corn flour.

Just out of the oven, note the blue colour from the blue corn flour.

And voila, two veggies saved from compost, three jars empty and ready to be packed, and a nice hearty snack to get me through the afternoon. I suspect this bread will toast up nicely and make heavenly croutons, too.

Adding a little zest to the holidays

Now that the Mayan calendar’s 14th Baktun has started with no hitches, it seems that there’ll be a 2013 after all – and the really good news (assuming the Values Institute at DGWB is better at predicting things than doomsday sites) is that food waste consciousness will be the top 2013 trend (with “meatless mainstreaming” coming in at number 4). Beth Hoffman, in an article she wrote for Forbes, seems to concur, listing food waste, humane animal treatment and food labelling as three issues of great importance that have finally made it into mainstream American consciousness.

It’s about time.

So, now that we’re all on the cusp of heightened food waste consciousness, I expect a few people will want to be making New Year’s resolutions to waste less, and if you’re looking for ways to do that, this article on CNN.com is a good place to start.

One food that the CNN article doesn’t mention, is citrus peels. Peels almost inevitably get wasted, which is a shame, because a little zest can add a great accent to sweet and savoury dishes, mulled beverages, teas, chutneys, pickles, cocktails and more. So why do so many peels end up in the bin? Simple: people rarely have cause to use citrus peel on the same day that they use the fruit … and on days that they do use zest, they often end up wasting the fruit.

It’s about timing.

In 2012, we decided to do something about that in our home, and started freezing peels whenever we ate citrus fruits. That provided us with a handy supply of zest throughout the year, with a big surplus at year end – perfect for making holiday candy.

We made our candied peels with some brandy, cinnamon, star anise, and cloves. The peels last for several months, and are versatile. They can be used in baking or as garnish, eaten straight or dipped in chocolate – and make a nice seasonal gift during the holidays.

Candied citrus peels

The extra bonus was the simple syrup infused with spice and citrus that was a byproduct of the process. It came in handy when we opened a bottle of red wine that was not as tasty as we’d hoped. We heated up the wine, and added one tablespoon of brandy along with two tablespoons of our new instant Glühwein syrup (patent pending) per serving – and, just like that, bad wine was transformed into very Christmasy mulled wine. I’m guessing the syrup will also be good for making spiced tea and cider.

Candied peel (8 cups)

Ingredients

  • 8 cups of citrus peels, sliced
  • 4 cups water
  • 8 cups sugar
  • ½ cup brandy
  • ½ teaspoon cloves
  • 1 cinnamon stick
  • 2 slices star anise

 Directions

  • Thaw peels (if needed) and slice into various shapes. We used a combination of thawed orange, blood orange, lemon and lime peels, as well as the fresh peels of a red pummelo and an oroblanco grapefruit Bonnie Lee had just used in a savoury fruit stew. The fresh peels were very thick with pith, and ended up having a texture similar to gummy bears, with great grapefruit notes.
  • Submerge peels in water, and bring to a boil. Drain. Repeat. Repeat again. This removes some of the bitterness from the pith.
  • Mix sugar and water. Boil for 10 minutes or so, until the syrup reached the thread stage (i.e., until syrup dripped from a spoon into cold water forms thin threads).
  • Add in the brandy, cloves, cinnamon, star anise, and peels, and simmer until the pith is translucent. This took about 2 hours for our batch.
  • Let peels dry on wire rack until they are no longer sticky (this can take up to a day).
  • Roll peels in sugar, if desired.
Fruit stew

The fruit stew that sparked the candy making.

Thawed peels

Thawed peels

Peels being candied

Peels being candied

Rolling peels in sugar

Rolling peels in sugar

Instant Glühwein

Instant Glühwein (patent pending)

Marching comfort food down the food chain

My handy desktop dictionary defines comfort food as, “food that provides consolation or a feeling of well-being, typically any with a high sugar or other carbohydrate content and associated with childhood or home cooking.”

I would add to that definition this: comfort foods, at least my comfort foods, are all warming. They are the equivalent of food hugs. And although not all my comfort foods are associated with childhood or even home cooking, they do share one trait: they are all tinged with nostalgia. Many of them are foods from Japan that I can no longer get easily, like udon – a bowl of which I always indulge in whenever I have a stopover in Tokyo, even if it’s in the middle of the night.

Of course the strongest nostalgia, and the warmest hugs, come from childhood foods – but often those are out of step with how we like to eat. Shepherds’ pie (a.k.a. pâté chinois in my family, and junk in Bonnie Lee’s) is one of those foods. Meat doesn’t cross our threshold very often – and when it does, it is for an indulgence, like our recent Thanksgiving meal – so Shepherd’s pie has been off the menu for a very long time. For day-to-day meals, we like to eat a little further down the food chain.

That’s why I was really happy to see this recipe for vegan shepherdess pie on Kellie’s Food to Glow (and endless source of food inspiration). I was on a trip when I saw it, and I knew it was something I’d be trying when I got home – and I did. It didn’t disappoint, either. The blend of umami and mashed potato, the textures, and the warmth led to a perfectly nostalgic moment, and the grown-up touches that my childhood palate might have missed (like the celery root in the mashed potato) added just enough of a twist to make it interesting.

Vegetarian shepherd's pie

So, I’m curious. What are your comfort foods? Have you adapted any of them to be more sustainable?

The Great Pumpkin

In October 1992, we bought a pumpkin.

Now, I don’t remember every gourd-like squash I’ve ever purchased, but this one was special. It wasn’t the first pumpkin I’d ever bought, and it wasn’t the biggest. In fact there was nothing remarkable about it at all, except this: it was the first pumpkin that I ever bought as food.

In the past, I had only procured pumpkins with the intention of carving faces into them. When I shopped for them, I looked for ones that were vaguely evil looking … sinister pumpkins, that looked like they would just as soon shoot me as look at me … soulless pumpkins that exuded quiet rage.

That all changed one afternoon in 1992, when we happened upon a pile of pumpkins at our local vegetable shop. In that moment, it struck me that pumpkins were food too … and remarkably inexpensive food at that (important, as we were saving for our honeymoon). And, as I looked at one pumpkin in particular – a tantalizingly plump and inviting one – I realized that it could feed us for a week.

We bought it, and embarked on what was to become a fun, week-long project: finding as many ways to eat our pumpkin as we could think of (this was in the olden days, and Mosaic was still a year in the future, so we had to rely on our own wits and knowledge). I still remember many of the things we ate that week: roasted pumpkin, pumpkin mash, roasted pumpkin seeds, spicy pumpkin stir fry, pumpkin soup (with a hint of maple and a dash of nutmeg), pumpkin pie and pumpkin quick bread. It fed us for a week, as predicted, and only the peel and stem ended up in the bin – something that felt like an accomplishment, somehow.

This year, there was no jack-o-lantern, but we did buy a little pumpkin, which Bonnie Lee turned into one of the most incredibly moist quick breads I’ve ever had, thanks in part to the addition of okara (soy pulp, a byproduct of making soy milk – more on that magic ingredient another day). The recipe is below…

Insanely moist pumpkin bread

The wet stuff & spices

  • 1½ cups pumpkin flesh (roasted then mashed)
  • 1 cup okara
  • 2 eggs
  • ⅔ cups sugar
  • ½ cup soy milk (unflavoured, unsweetened)
  • ½ cup birch syrup
  • ¼ cup honey
  • ¼ cup oil
  • 2 tsp ginger
  • 2 tsp allspice
  • 2 tsp nutmeg
  • 1 tsp vanilla
  • 1 tsp ground cloves

The dry stuff

  • 3 cups flour
  • 2 tsp baking soda
  • 2 tsp salt
  • ½ tsp baking powder

Directions

  • Preheat your oven to 350℉.
  • Grease two loaf pans (we use glass ones).
  • Mix the wet stuff and spices in a big bowl.
  • Mix the dry stuff in another big bowl.
  • Mix the dry stuff into the wet stuff.
  • Fill the loaf pans ⅔ full.
  • Bake for one hour, or until a wooden skewer or toothpick inserted into the bread comes out clean.
  • Let cool for 5 minutes, then remove from pan and cool on rack.

Refreshing, but fatal

This blog entry is a eulogy – and like all good eulogies, it starts with a poem.

     Gone after twenty years,
     With one soft and fatal gasp.
     My kitchen partner, who knew no fears…
     Gone! After twenty years.
     A void, and yet there are no tears,
     And to my neck I raise no asp.
     Gone. After twenty years.
     With one soft and fatal gasp.
.

What words can I use to describe my long time kitchen companion? Reliable? Tireless? Efficient? All of those, and more. Yet, now that I think of it, undeniably more sluggish lately; struggling to do what had once been so easy … so effortless.

Now those struggles are over, and my kitchen helper is still and lifeless. And, here, my confession: it was all my fault. I alone am to blame. Dessert was my idea, and it was the dessert that was fatal.

Mea cupla.

The recently departed, dear, little three cup Cuisinart was a wedding gift, and over the years it made falafel with us, velvety soups, dips, salsas … too many things to list. It wasn’t the biggest Cuisinart in the world, or the fanciest, but it was always there.

Reliable. Tireless. Efficient.

Easy to clean.

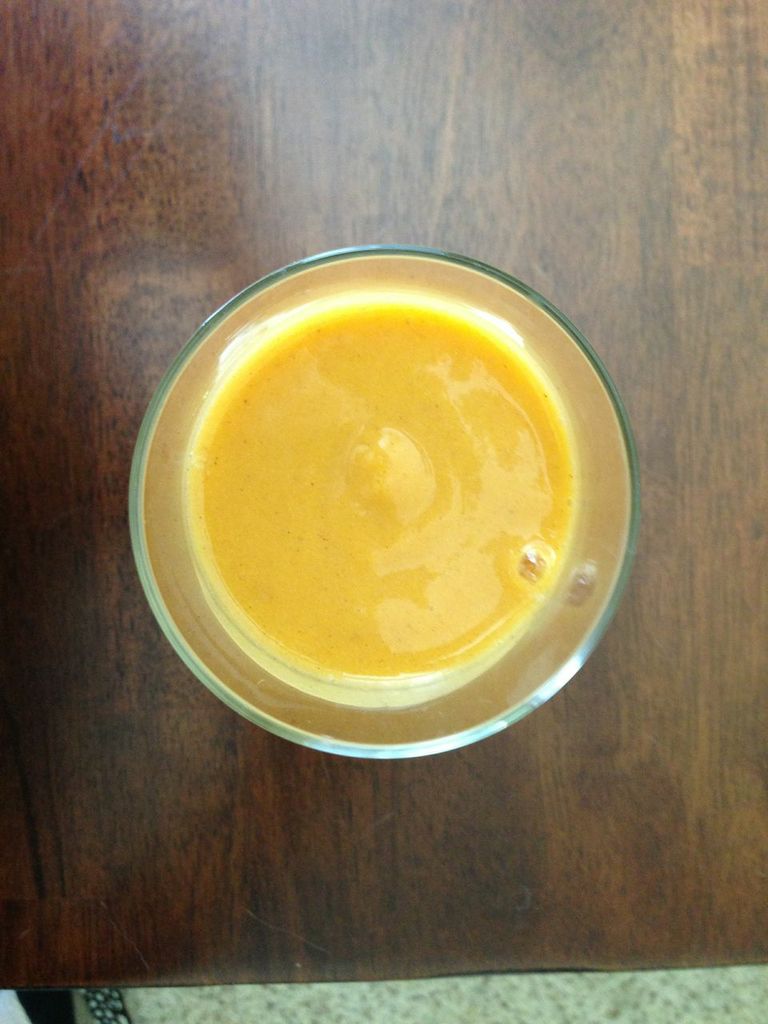
It was killed by two frozen bananas, which have become staples around here. An early commenter on 222 million tons shared this tip, “Sometimes I wait too long for my bananas to get that perfect balance of yellow and brown, so I freeze peeled bananas and then use it later for milkshakes! No need to add ice-cream or sugar to make it slushy or sweet.” It was wisdom we incorporated into our lives, to the detriment of our trusty little appliance. Mami, if you read this blog still, know that you have blood on your hands too. Cuisinart blood.

The silver lining on all this is that our marriage has outlived yet another wedding gift; another milestone has been crossed. We now know that our love is stronger than a three cup Cuisinart, romantic words that may well end up on the family tombstone – a lyrical epitaph indeed.

Garbage ulesAnd now to practicalities. We will need to dispose of the body; of the sad, tiny Cuisinart corpse. In Japan, that would have been easy. There was a shop that bought old appliances that could be salvaged for parts, and if they didn’t take it, the prominent poster over our garbage bin had information to steer us right. Here we’ll have to do a little research. And of course, although it’s a little soon to talk of such things, we will need a replacement – and if any of you have tips in that department, please share them in the comments. It may sound disrespectful, but we were ready for an upgrade anyway.

As a final act of remembrance, I feel I should share the recipe that killed the Cusinart. Usually, people refer to this treat as “one ingredient ice cream”, but in our home it has another name this week.

One appliance ice cream (serves 2)

One ingredient ice cream

Ingredients

  • Two frozen bananas
  • One Cuisinart

Directions

  • Remove bananas from freezer.
  • Slice finely with a heavy knife.
  • Place slices in Cuisinart and let sit for a few minutes, to give them time to soften (especially important if your Cuisinart is on it’s last legs).
  • Pulse on high until the bananas have the consistency of soft serve ice cream, or until smoke comes out of your Cuisinart.

This simple dessert is rich, refreshing, loaded with potassium, made with no animal products, and potentially fatal.

The last picture of it before it died.

The last picture of my kitchen helper before it passed on. RIP, little friend.

Seitanic bites?

I like meat.

Bonnie Lee likes meat.

Despite that, meat has never been a big part of our diet, and it’s not something we cook with at home very often.

We made that choice very consciously when we were first married based on simple arithmetic: it takes more land, water and sunshine to make a pound of meat than a pound of vegetables — and there is only so much water, sunshine and land to go around. Given that, and the fact that there are people who go to bed hungry, a meat-rich diet always felt like taking more than our fair share. It always felt selfish and wasteful.

Having been raised in traditional North American households, though, we both grew up with meat at the centre of our diets, and enjoy meat’s bite and texture, not to mention that burst of umami. When a meal calls for that, we often use seitan.

There are many varieties of commercial seitan, and most are very tasty, but if you’d rather opt out of the additives, packaging and transportation that come with processed food, you’ll be pleased to note that it’s easy to make at home. We made our fist batch this weekend, and it was better than any packaged seitan I’ve ever tried. It was flavourful on it’s own – even better after sitting in a chipotle marinade – and had a great mouthfeel. We used it to make tacos, which we served with a fresh homemade salsa and cilantro rice. I’m currently working on a vegetarian collection for the 222 million tons app, and this recipe definitely made the cut.

Seitan tacos

Seitan tacos

Seitan (six servings)

Ingredients

Seitan
Broth
  • 4 cups stone soup or other broth
  • 4 cups water
  • 2 Tbsp tamari sauce
  • ½ inch ginger
  • 1 thick slice of onion
  • 1 clove garlic

Directions

  • Warm 4¾ cups of stone soup broth over medium heat.
  • Remove ¾ cups of the broth to make the seitan. Add in the tamari, lemon juice and crushed garlic.
  • Put the flour in a bowl, pour in the spiced broth, and mix.
  • Take the elastic glob that forms out of the bowl, squeeze out any excess liquid, and knead it for 2 or 3 minutes until it gets tough.
  • Shape it into a loaf, and let it rest for 15 minutes.
  • While the seitan is resting, add the water, tamari sauce, ginger, onion and garlic to the remaining broth and bring to a low boil.
  • Cut the seitan loaf into ¼ inch slices, then boil those in the broth for about an hour.
Seitan cutlets

Seitan cutlets

Cherry vinegar & Thai pickled cherries

As I entered supermarket last Saturday, I was greeted by a stack of dark red cherries just begging to come home with me. I had just seen pickled cherries (something I’ve never tried before) used on the five and spice blog (which rocks), and was really intrigued by the idea. Growing up, we sometimes had cherries preserved in brandy or jam – something I was never tempted to make myself (we don’t eat a lot of sweets) – but cherries in vinegar, with maybe a little bit of hot spice? That sounded like the perfect way to enjoy the fruit throughout the year, perhaps with some cheeses or curry.

Bonnie Lee (she’s the brains of the operation) suggested that we add a little Thai twist to the pickle. Brilliant. So, that’s the way we decided to go. The results are in the picture below.

We ended up with about ½ cup of extra cherry vinegar, which is bright red, has a nice cherry finish, is slightly sweet, and will be great in dressings and marinades. We haven’t tasted the pickles yet, as we’re waiting for all those great flavours to blend. I’m traveling for work again – but they should be ready to crack open when I get back to the US in mid-August. I’ll let you know how they came out then.

Cherry vinegar & Thai pickled cherries

Ingredients

  • 2 quarts fresh cherries
  • 1 lime
  • 2 sticks dried lemon grass
  • 4 pieces dried Thai ginger (galangal)
  • 10 dried bird’s eye chilis
  • 2 cups distilled vinegar
  • ½ cup sugar
  • ¼ cup rice vinegar

You will also need a mason jar that holds 4 cups.

Directions

  • Wash and pit the cherries, discarding any that are not firm.
  • Demonstrate that you’re smarter than me by not wiping your cherry-juice-covered hands on your shirt.
  • Sterilize the mason jar.
  • Zest the lime, and place the zest in the mason jar.
  • Toss the lemon grass, ginger, and bird’s eye chilis in the mason jar.
  • Pour the distilled and rice vinegars in a deep skillet, and squeeze in the juice of your lime. Add in the sugar, and stir over medium heat until the sugar dissolves.
  • When the vinegar solution is warm, add in the cherries and poach them in vinegar for about 3 or 4 minutes.
  • Remove the cherries from the vinegar with a slotted spoon, and put them in the mason jar.
  • Strain the bright red vinegar through a wire mesh.
  • Pour enough strained vinegar into the mason jar to cover the cherries.
  • Put the remaining vinegar in a clean bottle.